
本文发布于431天前,本文最后更新于145 天前,其中的信息可能已经过时,如有错误请发送邮件到firewormq@qq.com
相关文档:
文章下载:搭建Vulfocus漏洞复现平台.zip
目录:
1. 安装环境
- 本环境为Ubantu 18.04 64位
2. 下载所需要的包和集成环境
相关包
- <1>. 更新apt-get源
apt-get update
- <2>. 安装docker
apt-get install docker
- <3>. 安装docker-compose
apt-get install -y docker-compose
集成安装环境
- <1>. 切换到”/”目录,创建”f8x”并进入”f8x”目录
cd /;mkdir f8x;cd f8x - <2>. 下载f8x集成环境
wget : wget -O f8x https://f8x.io/
- <3>. 可查看集成安装环境详细使用命令
bash f8x -h
3. 拉取并开启docker
- <1>. 使用集成安装环境拉取并安装Vulfocus
bash f8x -vulfocus
- <2>. 开启并运行docker
docker run -p 80:80 -v /var/run/docker.sock:/var/run/docker.sock -e VUL_IP=0.0.0.0 vulfocus/vulfocus
4. 登录Vulfocus
- <1>. 输入网站域名/ip登录vulfocus
- <2>. 默认账号密码:admin/admin
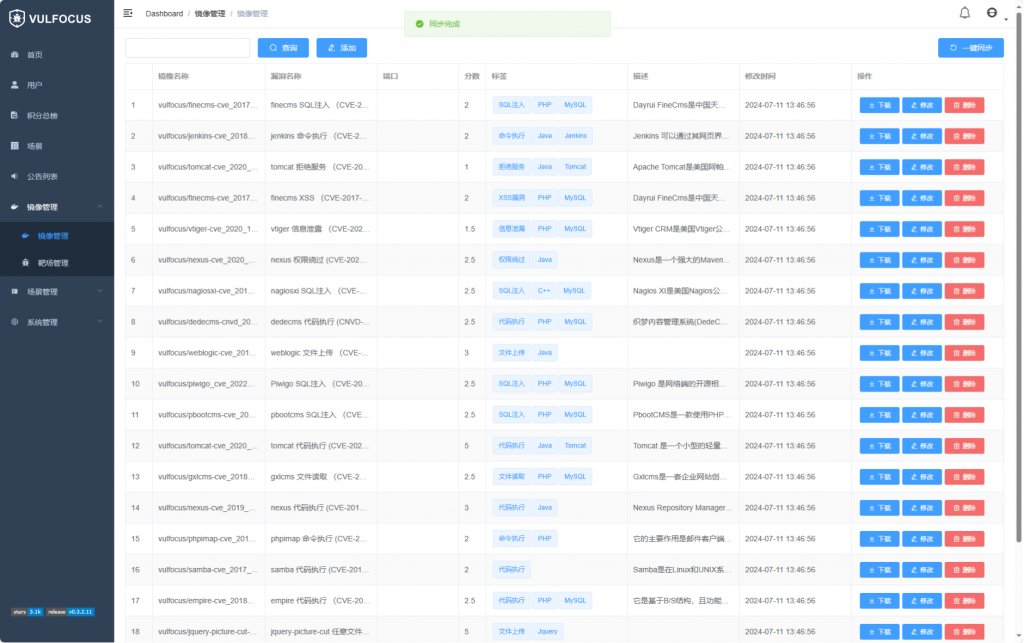
- <3>. 主页–>镜像管理–>镜像管理–>一键同步(右上角)
- <4>. 同步成功,完结撒花!
5. 意外状况方法解决
云服务器搭建无法访问
核查方法:查看安全组策略是否开启了80端口
文章更新(更新时间:2024/07/08)
更新原因
因LeouMaster师傅的提出的相关问题,我经过测试后有关F8x的vulfocus给出的相关镜像地址已失效。我这里给出另一个搭建解决方案,因为之前我搭建成功过,我会将镜像打包在百度网盘,由大家自行下载。
vulfocus镜像打包文件:vulfocus.tar
该文件哈希值如下,如不正确请重新下载,或者留言告知。
C:\Users\Fireworm>CertUtil -hashfile E:\docker\vulfocus.tar md5
MD5 的 E:\docker\vulfocus.tar 哈希:
7f09e0ab92342ca05fba2de34b81a2e9
CertUtil: -hashfile 命令成功完成。
搭建步骤
注:这里的搭建基于前面的环境基础
1.下载上面的文件镜像并上传至服务器
2.加载镜像
# 加载镜像vulfocus.tar的压缩包
docker load -i vulfocus.tar
# 查看当前有哪些docker
docker images
# 加载docker,端口为80
docker run -p 80:80 -v /var/run/docker.sock:/var/run/docker.sock -e VUL_IP=0.0.0.0 vulfocus/vulfocus
输入网站域名/ip登录vulfocus访问即可,账号密码(默认)在前面。
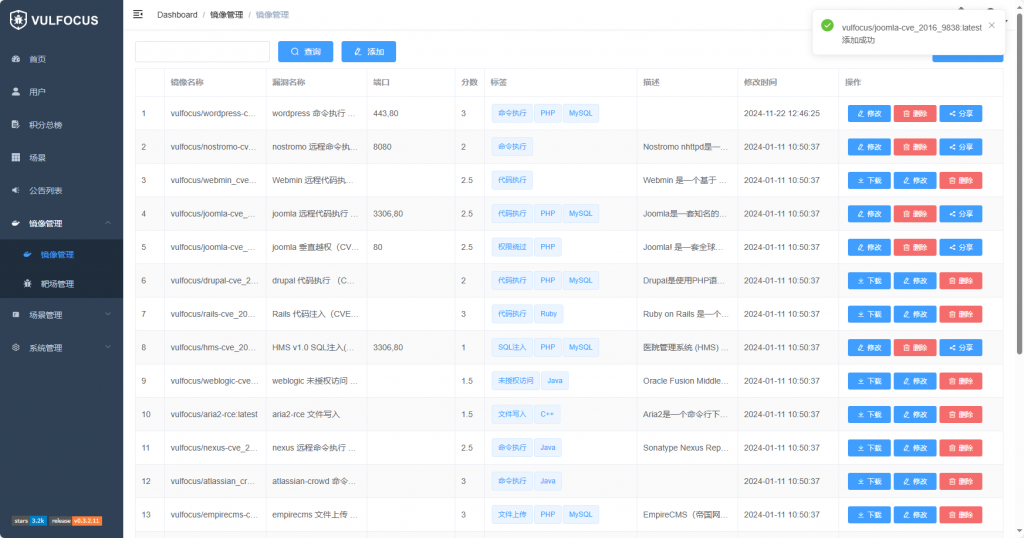
此镜像是之前我搭建好的镜像,且正常同步漏洞列表。(如下图)
文章更新(更新时间:2024/11/23)
因 Yuan 师傅的提出的相关问题,我经过测试后有关打包后原来 docker 中自带的漏洞Docker下载地址失效了,导致下载不了漏洞 Docker,这里给出相应解决方案。
1. 添加能有效获取的镜像地址
在该路径的文件 /etc/docker/daemon.json 下添加镜像获取地址 (没有该文件的创建即可)
vi /etc/docker/daemon.json{
"registry-mirrors": [
"https://dockerproxy.com",
"https://hccwwfjl.mirror.aliyuncs.com",
"https://docker.1ms.run",
"https://doublezonline.cloud",
"https://dislabaiot.xyz",
"https://docker.fxxk.dedyn.io",
"https://dockerpull.org",
"https://docker.unsee.tech",
"https://hub.rat.dev",
"https://docker.1panel.live",
"https://docker.1panelproxy.com",
"https://proxy.1panel.live",
"https://docker.nastool.de",
"https://docker.zhai.cm",
"https://docker.5z5f.com",
"https://a.ussh.net",
"https://docker.udayun.com",
"https://hub.geekery.cn",
"https://docker.anye.in"
]
}注:以上地址如果都失效可以自行网上搜索(关键词:Docker镜像加速地址)相关有效地址再重复进行以下步骤
2. 重新加载
# 重新加载相关配置文件
systemctl daemon-reload
# 重新启动Docker
systemctl resteart docker
注:本文章和工具(该工具为网络资源非本人开发)仅供学习和研究使用,请勿使用项目的技术手段用于非法用途,任何人造成的任何负面影响,与本人无关.

我在本地搭建的,然后环境启动成功之后,拒绝访问
可以查一下本地的防火墙是否关闭,这可能会影响到端口访问。
搭建完后访问云服务器ip:端口访问不到是怎么回事,容器是显示存在的
这种可能是云服务器的防火墙策略没有设置,验证是这个问题你可以在云服务器浏览器上登录你本机的”ip:端口”/”127.0.0.1/端口”,如果云服务器上能正常访问则是云上的防火墙策略没有打开,要设置为允许所有的端口通行,具体步骤网上有很多。
师傅, 为什么我搭建好了, 但是点击下载的时候就提示失败呢
可能是内置的镜像源的地址失效了,我后面看一下再更新文章,目前尝试着去其它漏洞平台下载进行导入了。
Yuan师傅,文章已更新,该问题已解决。
大佬,我按照你的这个设置,但是有一个问题就是proxy的,这个我应该怎么设置啊?
这个不需要proxy,都是F8X自动配置的,以docker环境安装.跟着步骤来就可以了,如果有哪一步有问题可以问我.
我按照网上的教程搭建的,然后每次都是拉取不了vulfocus的镜像,docker pull 之后提示的是xxxx is layer啥玩意儿来着,网上的教程说要修改daemon.json里面的内容,我改成了阿里云的镜像加速的域名,然后的确是拉取下来的,但是一键同步提示服务器内部错误,联系管理员,这个问题官网说修改镜像里面的url,我改了也不行,然后看到有人说现在国内镜像不支持vulfocus需要用代理啥的
你按照我的这个步骤来就行,这个没有问题的,不需要配置那些很麻烦的东西.如果我的这个搭建方式有问题的话你可以再问我.
我按照你的步骤做的,第三步拉取安装vulfocus的时候就报错了
—–Start execution—–
14:03:51 [INFOR] – /ffffffff0x folder already exists
14:03:51 [ALERT] – Some regions can be configured to use proxies to increase speed
14:03:53 [INFOR] – Pass~
14:03:53 [INFOR] – Checking Docker environment availability
14:03:53 [ALERT] – Dependencies not passed, start automatic installation of Docker
14:03:53 [INFOR] – Uninstalling the Docker environment
14:07:17 [ERROR] – apt-transport-https installation failed
14:09:07 [ERROR] – ca-certificates installation failed
14:09:07 [INFOR] – Successfully installed curl
14:09:08 [ERROR] – software-properties-common installation failed
14:13:27 [ERROR] – gnupg installation failed
Warning: apt-key is deprecated. Manage keyring files in trusted.gpg.d instead (see apt-key(8)).
curl: (6) Could not resolve host: download.docker.com
gpg: no valid OpenPGP data found.
14:13:39 [INFOR] – Updating apt package list
14:14:56 [ALERT] – Installing docker
14:14:57 [ERROR] – docker-ce installation failed, please check if the network is reachable, proxychains4 configuration is correct
14:14:57 [ERROR] – docker service startup failed
14:14:57 [ERROR] – Failed to configure boot items
14:14:58 [ERROR] – docker-compose-plugin installation failed
14:14:58 [INFOR] – pip3 dependencies are normal
14:16:52 [ERROR] – docker-compose module installation failed
14:16:52 [ERROR] – docker-compose-plugin installation failed
14:16:52 [INFOR] – pip3 dependencies are normal
14:16:58 [ERROR] – docker-compose module installation failed
14:16:58 [ERROR] – docker-compose-plugin installation failed
14:16:58 [INFOR] – pip3 dependencies are normal
14:17:03 [ERROR] – docker-compose module installation failed
f8x: line 7727: docker: command not found
14:17:03 [ERROR] – vulfocus installation failed
—–End of execution—–
然后是因为镜像源的问题,我改成了中科大的源
重新进行到第三步又出现了我用docker pull出现的问题了
—–Start execution—–
14:30:54 [INFOR] – /ffffffff0x folder already exists
14:30:54 [ALERT] – Some regions can be configured to use proxies to increase speed
14:30:56 [INFOR] – Pass~
14:30:56 [INFOR] – Checking Docker environment availability
14:30:56 [INFOR] – Docker passed~
14:30:57 [ERROR] – docker-compose-plugin installation failed
14:30:58 [ALERT] – docker-compose installed
14:30:58 [INFOR] – Docker passed~
latest: Pulling from vulfocus/vulfocus
0e29546d541c: Retrying in 1 second
9b829c73b52b: Retrying in 1 second
cb5b7ae36172: Retrying in 1 second
6494e4811622: Waiting
6f9f74896dfa: Waiting
fcb6d5f7c986: Waiting
290438add9da: Waiting
ab11df61f44a: Waiting
de4793a5fa46: Waiting
6cf8823c7eb8: Waiting
4f4fb700ef54: Waiting
247fdb311b11: Waiting
4d3c0174a5aa: Waiting
e7940ae787bf: Waiting
error pulling image configuration: download failed after attempts=6: dial tcp: lookup registry-1.docker.io on 10.10.10.2:53: read udp 10.10.10.20:47105->10.10.10.2:53: i/o timeout
14:32:58 [ERROR] – vulfocus installation failed
—–End of execution—–
然后我修改了daemon.json内容,就是登录阿里云镜像加速服务里面的那个,拉取成功了,但是登录web之后镜像列表一键同步不了,提示服务器内部错误,联系管理员
嗯,确实我刚测试了下,f8x的镜像地址都不行了.我之前搭建好过,看能不能把镜像打包.
感谢!!
LeouMaster师傅,文章已更新,可根据这个进行搭建,如果还有问题,可以问我。
文章已更新,我将我搭建成功的镜像打包了,去百度网盘下载就好。